Upgrading Jenkins to a New Version and Updating Plugins: A Guide
Jenkins: An Open Source Automation Server for Building, Deploying, and Automating Enterprise Applications
If you rely on Jenkins for production deployment, it’s crucial to keep it current with the latest version. Fortunately, Jenkins benefits from a vibrant open source community that continually releases new versions with valuable features and bug fixes.
This tutorial will demonstrate how to upgrade Jenkins to a newer version and update all associated plugins.
Determining the Current Version of Jenkins
To determine your present Jenkins version, you can take either of the following steps:
First, when using the Jenkins UI, glance at the bottom right-hand corner of any screen to view your current Jenkins version.
Alternatively, log in to the Jenkins server and use the jenkins-cli.jar to execute the following command from the command line and retrieve the current version.
java -jar jenkins-cli.jar -s http://localhost:8080/ version
Upon logging in to the Jenkins UI and selecting the “Manage Jenkins” menu item, if an upgrade is required, a notification will appear at the top indicating that a new version of Jenkins is available for download.

To illustrate, the currently available update is Jenkins ver. 2.9, which I will upgrade to from version 2.5. However, it’s important to note that the upgrade process is comparable for all versions of Jenkins.
By the way, make sure to use the admin account you created during Jenkins Security Setup to access the GUI.
Obtaining the New Jenkins WAR File
When selecting the download link in the aforementioned message, the entire Jenkins installer will not be downloaded; rather, solely the jenkins.war file will be obtained.
To retrieve the war file, you may simply copy the download link from your Jenkins GUI and proceed to the command prompt, utilizing wget for the download process.
cd /downloads
wget http://updates.jenkins-ci.org/download/war/2.9/jenkins.war
Installing the New Jenkins WAR File
The jenkins.war file on your server is situated in the /usr/lib/jenkins directory.
Prior to copying the new version of the jenkins war file, make a backup of the current version by running the following command:
cp /usr/lib/jenkins/jenkins.war /downloads/jenkins.war.previous.versionNext, copy the freshly downloaded war file to the /usr/lib/jenkins directory:
cp /downloads/jenkins.war /usr/lib/jenkins/Then, restart the Jenkins service by utilizing either the systemctl or service command as illustrated below:
systemctl stop jenkinssystemctl start jenkinsPost-Upgrade Duties
Following the upgrade, log in to the Jenkins UI and verify that you can see the new version number located in the bottom right corner.
Alternatively, use the command line to execute the following command and check the new version:
java -jar jenkins-cli.jar -s http://localhost:8080/ version
In this instance, the new version I see after the upgrade is Jenkins ver. 2.9.
Furthermore, upon visiting the “Manage Jenkins” page, the upgrade notification will no longer be visible. However, any additional tasks necessary for your Jenkins server will be displayed here.
For instance, in this scenario, I see a recommendation to activate the agent to master security subsystem.

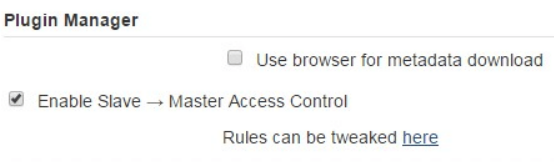
To accomplish this, proceed to Configure global security. Scroll down to the bottom section labeled “Plugin Manager”, where you will notice that “Enable Slave -> Master Access Control” is unchecked. Click the checkbox to select this option.
When you enable “Enable Slave,” the following message will appear right beneath it: “Rules can be tweaked here.” Afterward, click Save.
Upgrade Jenkins Plugins
Scroll to the bottom of the page and select the “Select All” option. Next, click on the “Download now and install after restart” button. This will initiate the update process for all plugins.
During the update process, you will see a checkbox at the bottom of the page. Be sure to select it: “Restart Jenkins when installation is complete and no jobs are running.”
If auto-refresh is not enabled (you can check the top right corner of the page), you must manually refresh the page to check if the upgrade has been completed. After the upgrade, you will need to log in again.
Jenkins and Plugins Upgrade Completed
Once all the plugins have been successfully upgraded, you should no longer see the “(updates available)” warning next to “Manage Plugins”. In addition, if you navigate to the plugin manager and click on the “Updates” tab, it should say “no updates” available.
If you have completed all of the post-upgrade tasks, you should not see any warning messages on the “Manage Jenkins” screen, as shown below.