How to Install Minikube on Ubuntu and Set up Your Kubernetes Cluster
Minikube is a powerful tool for quickly creating a local Kubernetes cluster on your local machine. It lets you play with Kubernetes without the requirement for a specific cluster or cloud provider. Minikube hosts a single-node Kubernetes cluster on your local workstation, making it a great tool for learning Kubernetes or testing new Kubernetes applications.
Minikube installation is a simple and straightforward procedure. First, check that your machine matches the prerequisites. Finally, download and install the Minikube binary, which is available for a variety of operating systems, including Ubuntu. After installing Minikube, you can start using it to deploy and manage Kubernetes applications.
This blog will walk you through the steps of installing Minikube on Ubuntu. We will go through the prerequisites, download the Minikube binary, and install Minikube on Ubuntu. After that, we will show how to use Minikube to launch a local Kubernetes cluster. So, let’s get started!
Prerequisites:
Before installing Minikube, make sure that your system matches the following requirements:
-A minimum of two CPU cores,
-Two Gigabytes of RAM,
-Twenty Gigabytes of free storage space on your PC
Once you have met these requirements, you can proceed with the installation of Minikube
Setting up Docker
Minikube supports a variety of container runtimes, but we’ll be using Docker for this tutorial. Use the official installation procedure for your operating system to install Docker.
Use the following commands to do this:
- Add the Docker GPG key:
$ curl -fsSL https://download.docker.com/linux/ubuntu/gpg | sudo gpg –dearmor -o /usr/share/keyrings/docker-archive-keyring.gpg
- Add the Docker repository:
$ echo “deb [arch=amd64 signed-by=/usr/share/keyrings/docker-archive-keyring.gpg] https://download.docker.com/linux/ubuntu $(lsb_release -cs) stable” | sudo tee /etc/apt/sources.list.d/docker.list > /dev/null
- Install the necessary dependencies:
$ sudo apt-get install apt-transport-https ca-certificates curl gnupg lsb-release -y
- Update packages:
$ sudo apt-get update
- Install Docker:
$ sudo apt-get install docker-ce docker-ce-cli containerd.io –y
- At last, use the command to add your user to the docker group:
$ sudo usermod -aG docker $USER
To see the changes take effect, log out and back in.
Minikube Installation
To install it, open a terminal window and enter the following commands:
- Downloading Minikube Binary:
$ wget https://storage.googleapis.com/minikube/releases/latest/minikube-linux-amd64
- Copying files to bin directory:
$ sudo cp minikube-linux-amd64 /usr/local/bin/minikube
- Giving the Minikube file Executable Permission:
$ sudo chmod +x /usr/local/bin/minikube
Kubectl Installation
The kubectl command-line must then be installed. This is used to interact with the Kubernetes API server. You can obtain it by using the following command:
- Downloading kubectl Binary:
$ curl -LO https://storage.googleapis.com/kubernetes-release/release/`curl -s https://storage.googleapis.com/kubernetes-release/release/stable.txt`/bin/linux/amd64/kubectl
- Giving Executable permission:
$ sudo chmod +x kubectl
- Moving the file to bin directory:
$ sudo mv kubectl /usr/local/bin/
Starting Minikube:
With Docker and Minikube installed, we’re ready to launch our local Kubernetes cluster. Run the following command to launch Minikube using Docker as the container runtime:
$ minikube start –driver=docker
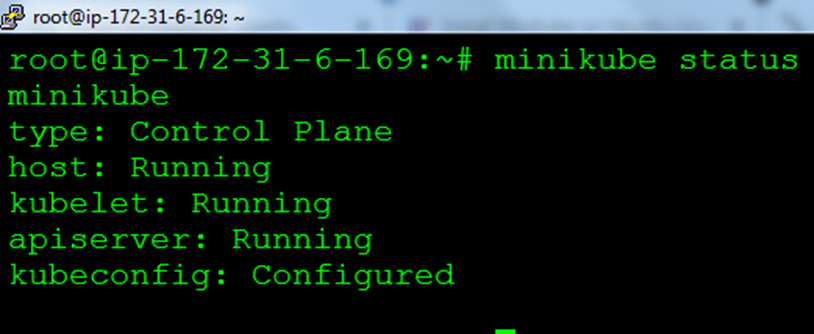
This will download and launch a single-node Kubernetes cluster on your local system. After it’s up and running, use the following command to check on its status:
$ minikube status
The output should look like this:
That’s all! Minikube was successfully installed on our Ubuntu machine. Thank you for sticking throughout this tutorial. We hope you found it useful in getting started with Minikube with Kubernetes.