Kubernetes Deployment: How to Deploy and Manage Your Applications with Ease
Kubernetes is an open-source container orchestration technology that automates the deployment, scaling, and management of containerized applications. It offers a comprehensive collection of tools for managing container workloads in a highly available, scalable, and fault-tolerant way. One of Kubernetes’ key features is deployment, which allows you to easily deploy and manage applications.
In this blog article, we’ll go over Kubernetes deployment in-depth, covering what it is, how it works, and how you can use it to deploy applications.
Understanding Kubernetes Deployment
What exactly is a deployment in Kubernetes?
In Kubernetes, a deployment is a high-level object that manages the creation and updating of replicas for a certain application. It ensures that a certain number of replicas of the application are always running, and it can also handle scaling, rolling updates, and rollbacks.
How does a deployment work?
A deployment works by defining a desired state for your application and then using Kubernetes to ensure that the current state matches the desired state. When you create a deployment, you specify the number of replicas you want to run, the container image to use, and other configuration settings. Kubernetes then creates and maintains replicas of the application to match this desired state.
Benefits of Kubernetes deployment:
There are various advantages to using Kubernetes deployment, including:
- High availability: Kubernetes deployment ensures that your application is always available by creating and maintaining replicas of the application.
- Scalability: Kubernetes deployment allows you to easily scale your application up or down based on demand.
- Self-healing: If a replica of your application fails, Kubernetes deployment will automatically construct a new replica to replace it.
- Rollouts and rollbacks: Kubernetes deployment makes it simple to perform rolling updates or rollbacks to your application.
Creating a deployment YAML file
The YAML file typically begins with
- The apiVersion field, which defines the Kubernetes API version used in the YAML file.
- The kind field specifies the kind of Kubernetes resource being created, which in this case is a Deployment.
- The metadata field is used to define deployment metadata such as the deployment name and any labels that should be applied to the deployment.
- The spec field is used to specify the deployment’s desired state. This includes the number of replicas (replicas field), the selector to match the pods in the deployment (selector field), and the template to create each replica (template field).
- The selector field is used to specify which pods should be included in the deployment. Labels are commonly used for this.
- The replicas field indicates the number of replicas that should be included in the deployment.
- The template field specifies which template should be used to create each replica. This contains details about the container image to be used (image field), any configuration or environment variables that should be passed to the container (env field), and any ports that the container should expose (ports field).
Ultimately, the Deployment YAML file allows you to declare the desired state of the deployment declaratively, and Kubernetes will manage the lifecycle of the replicas to ensure that they match the desired state. This simplifies the deployment and management of apps at scale in Kubernetes.
Here’s an example YAML file for a simple Nginx application:
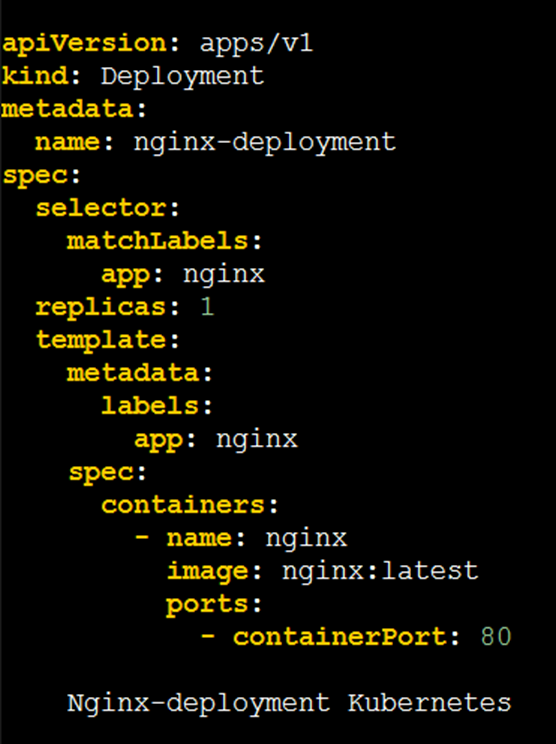
This YAML file creates the nginx-deployment Kubernetes Deployment. It specifies that the container image to be used is the latest version of the official Nginx image (image: nginx:latest) and defines a single replica of the app (replicas: 1).
The port section specifies that the container listens on port 80. When you create a service to expose this deployment, you can connect to the Nginx web server through port 80.
To create the deployment, save the above YAML file to a file (e.g., nginx-deployment.yaml) and run the following command:
This will create a deployment called nginx-deployment and run a single replica of the Nginx container.
$ kubectl apply -f nginx-deployment.yaml
You can also use the kubectl get command to check the status of your deployment:
This will give you a list of all the deployments in your Kubernetes cluster, along with their current state and the number of replicas that have been created.
$ kubectl get deployments

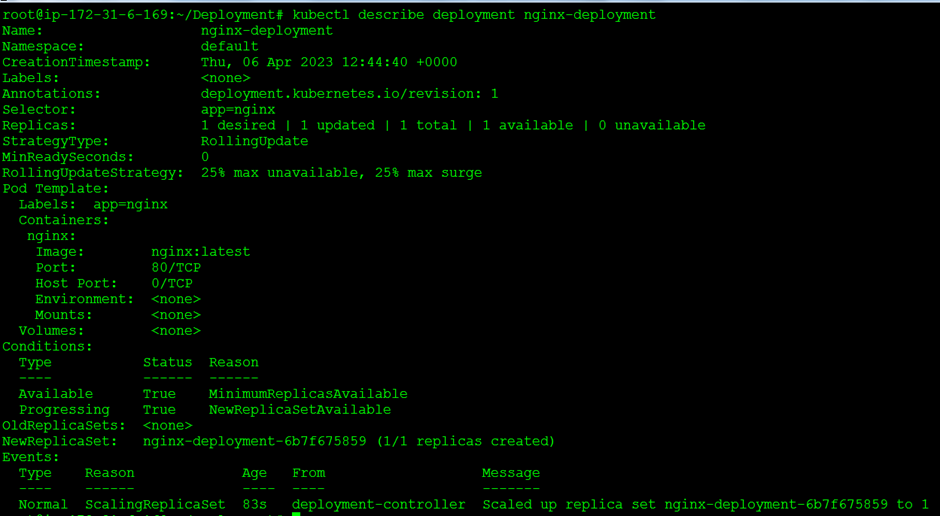
To get more information about a given deployment, use the kubectl description command:
This will display detailed information about the nginx-deployment deployment, including its current status, replicas, and any events or problems that have happened.
$ kubectl describe deployment nginx-deployment
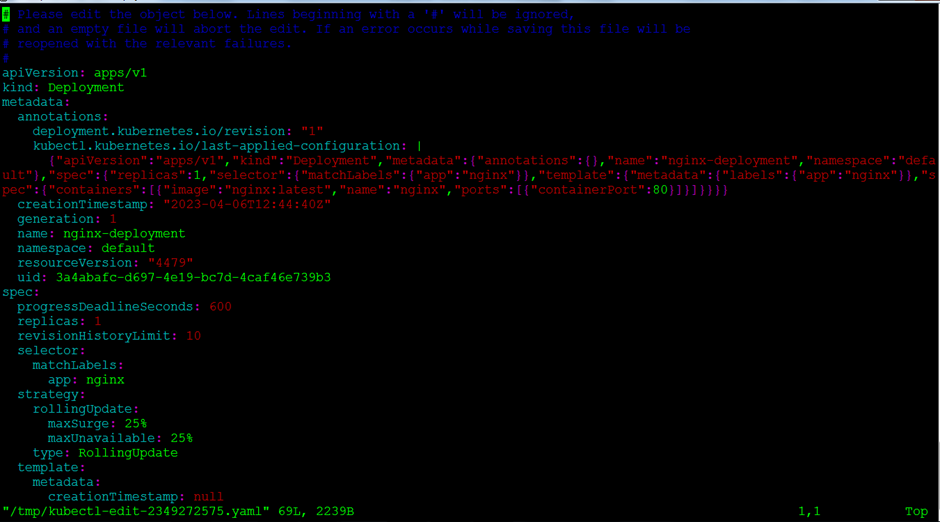
To edit a Deployment YAML file in Kubernetes:
1) Use the kubectl edit command:
This will open the Deployment YAML file in your usual editor, allowing you to make changes to the YAML file directly.
Replace nginx-deployment with the name of the deployment you want to modify.
$ kubectl edit deployment nginx-deployment
2) Use the kubectl apply command:
Use a text editor or another tool to make the necessary changes to your Deployment YAML file. Save the modified Deployment YAML file to your local machine.
To apply the changes to your deployment, use the following command:
$ kubectl apply -f nginx-deployment.yaml
For example, in my nginx-deployment.yaml file, I changed my replica set value to “2”.

Lastly, we can delete our deployment with this command.
$ kubectl delete -f nginx-deployment.yaml
Deploying applications in Kubernetes can seem daunting at first, but with practice and experience, it becomes much easier. I hope this information on deploying apps using Kubernetes has been useful and informative.